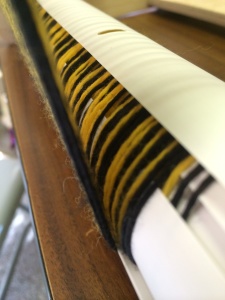
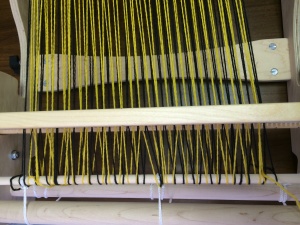
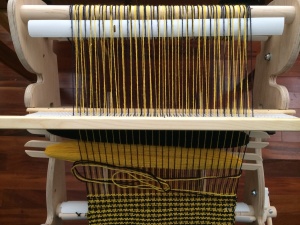
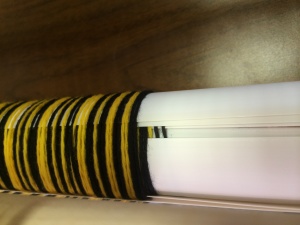
A couple weeks ago, I wrote about making warp sticks from vinyl blinds. Last Friday, I tied on my first warp using the homemade warp sticks. I’m just about finished weaving this project — I should finish it later today — so I thought I’d share a little bit about my experience. Short story: I loved them!
The main reason I wanted to use warp sticks was because I thought it would be easier for me to wind the warp onto the warp beam by myself if I used warp sticks rather than heavy paper. I did not get to test this hypothesis. One of the women that was in the same beginner’s weaving class I took in September asked if I would help her tie on a warp. It was her first project after the class and she wasn’t sure she remembered all the steps. So the two of us brought our looms to our LYS and we tied a warp onto her loom and then onto mine. Even though I did not directly test the hypothesis, I still think the warp sticks will be easier than the paper. I was able to place a warp stick where it needed to be and it would stay in place while I continued winding. This addresses my single biggest challenge with using a strip of paper. In my experience, the paper has a tendency to crinkle and won’t wind on straight without continual guidance. When I’m warping on by myself, I just don’t have enough hands to guide the paper, turn the handle for the warp beam, and keep tension on the yarn all at the same time.

I wasn’t sure exactly how many warp sticks I would need and I forgot to count them as I was putting them in place. I’ve been counting them as they come out of the project. I used a total of 25 warp sticks on this 100″ warp. I used quite a few on the first round to cover the apron bar and make as smooth a surface as possible for the subsequent layers of warp. After that, I put in 1 to 2 warp sticks per rotation of the warp beam.
Since I have a plethora of warp sticks, I used them for two other purposes. First, I used one round of warp sticks on the cloth beam to cover the knots used to tie the warp to the front apron bar. I have been unhappy with the way that these knots affect the tension of the weaving area and thought using warp sticks to cover the knots might help. While the warp sticks did not entirely solve the problem, I did think my tension was much less affected by the knots than my previous projects had been.
Second, I used one warp stick to help keep a clean shed. The houndstooth check is formed by warping two warp threads of one color (black, in my case) alternating with two strands of a second color (yellow) and using that same pattern in the weft (two picks black followed by two picks yellow). When tying on your warp, you have two options: cut the yarn and tie it to the apron beam each time you change color or warp all of one color first then warp the second color. If you choose the latter option, which I did, you end up with the colors criss crossing along your apron rod.

This criss crossing can interfere with getting a clean shed. If the crossing gets too close to the heddles, your shed is not as open as it should be. The solution to this problem is to slide something in the shed behind the heddles and then push it up to the back beam. I used one of my homemade warp sticks for this purpose, but you can also use a pick up stick or a piece of thick paper like card stock or a manila folder that is cut to the appropriate size.

Since the warp stick is placed straight through a shed — you are not selectively picking up warp threads to create warp floats — it does not affect your warp pattern and can stay in place while you weave. You do not have to adjust it each time you change sheds. You only adjust it when you wind onto the cloth beam. It will move forward a bit as you wind, so you slide it back into position and, if necessary move any criss crossing between the heddles and the back beam so that it is behind the warp stick.
The warp sticks worked exactly as I hoped they would and I am very happy with them. One thing that I did not anticipate was how much joy I would get when a warp stick came out of the warp. As I was weaving, I did not pay attention to the where the warp sticks were. Every once in a while, as I wound onto the cloth beam, a warp stick would fall out of the warp onto the ground or table below my loom. The sound of the warp stick hitting the ground made me happy because it signified progress. When I am doing a project like this one where I’m just weaving until I run out of warp, I do not measure the finished weaving as I work. When I used paper, I would sometimes glance at the warp beam and see the bundle of yarn getting smaller, but I didn’t have much sense of making progress. That little sound of the warp stick hitting the ground is an affirmation that work has happened and I found it satisfying in a way that the visual survey of the warp beam never was.
I have one small problem with using these vinyl pieces as warp sticks: they are dust magnets. I don’t know if they are full of static or what, but when they fall to the floor they pick up any small bits (especially cat hair) that may be on their landing spot. Given the benefits of using them, I see this as a minor inconvenience. I wipe each one off as I pick it up. If I had to I could easily wash them in a sink of soapy water. So far, wiping them off is working just fine.
I am very happy with the way the warp sticks worked on this project. When I tie on my next warp (which will probably be tomorrow), I will wind on by myself so I can let you know if it is in fact easier than using paper.


Just loved your ingenuity and hope to try this out myself soon! Thanks for the post! 🙂
Use fabric sheets to wipe the static off your vinyl warp separators. Works.