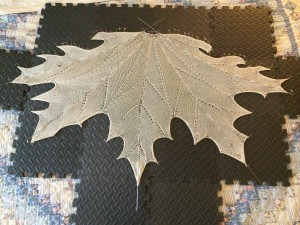
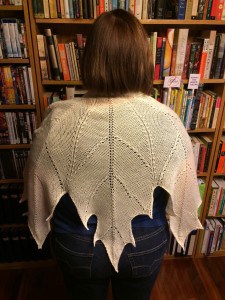
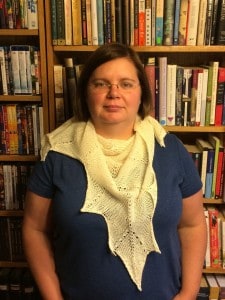
I finished the second MAPLE LEAF shawl during the last few days of May. Knitting this shawl as written results in 52 ends to be woven in after knitting is complete. I prefer to avoid weaving in that many ends if I can. In the Ravelry pattern notes, the designer said you could crochet slip stitch from the cast on point to where you need to start knitting next. When I knit MAPLE LEAF the First, I discovered that if I wanted to crochet slip stitch, I could not knit the pattern in the order it was written because I would have to slip stitch across live stitches. So I modified the pattern by rearranging the order of knitting so that I would not be slip stitching across live stitches. Unfortunately, I did not take notes while knitting MAPLE LEAF the First, mostly because I was knitting off my iPad rather than a printed pattern. For MAPLE LEAF the Second, I took notes as I went along. This post will include all my modifications, by reference to the original pattern. It’s taken this long for me to write up this post because I knew it would take a while to write it and I did not have enough time during the first couple weeks of June.
Official Stats
- Pattern: Maple Leaf Knit Shawl by Natalia @ Elfmonda
- Yarn: 504 yards Sheila Sock Yarn from Wool 2 Dye 4, undyed (I will dye the finished shawl later)
- Needles: US 7 /4.5 mm
- Finished Dimensions: approximately 36″ x 52″ at longest and widest points
- Made for: ?, Christmas 2014
- Ravelry Project Page
About this Project
I finished MAPLE LEAF the First before I started blogging regularly, so I will start with a little background on how I came across this pattern. It all started back in December 2013 when senkatnovo posted a link to this pattern in the Ravenclaw Common Room. Several Ravenclaws fell in love with the pattern and things spiraled from there, as they often do in the creative, cooperative, and competitive environment that is the Common Room! Before you knew it, there was a KAL during the Winter 2014 HPKCHC term, under the title “Battle Maidens of the Mapocalypse.” Somewhere along the way we all (as you see that I do) started referring to the MAPLE LEAF shawl in all uppercase letters. I think of it as a battle cry 🙂 By the end of the term, more than 20 Ravenclaws had at least started a MAPLE LEAF shawl. Cyprienne wrote a blog post on the Ravenclaw Aerie with pictures of all of them. I just did a quick count on the pattern statistics and of the 175 projects, at least 27 of them are by Ravenclaws. When we all started knitting, we were the only projects on the pattern!
With so many people working on this project, one thing quickly became clear: the pattern does not take nearly as many yards of yarn as it claims. Most of us came in around 500 yards. No one came close to the minimum 766 yards the pattern says you will use. This pattern is also not as difficult to knit as you might think. In her pattern notes, the designer says that it took her about 20 hours to knit. I haven’t timed myself, but I would guess I am knitting these up in a similar amount of time.
I am a pretty fast knitter, but I did not expect to get that kind of speed on a shawl. The reason I could do so is that this is basically a stockinette piece with occasional yarn overs. You knit the main central part of the shawl, then divide into sections, which the designer calls corners, to knit the points. There’s a total of 5 corners and each one is subdivided into smaller sections to get the many points of the leaf. It is all stockinette, with a few yarn overs and paired decreases to form the ribs of the leaf. The wrong side rows are purl straight across, with no patterning. Due to the relatively straightforward knitting, I think this would be a great first shawl pattern!
There is one thing the designer left open to you — choosing an edge stitch. The pattern is written with one edge stitch on each seam. These are denoted as es, and it is up to you to determine how you want to handle them. Many people knit it, forming a one-stitch garter border. I knit the last stitch of each row and slipped the first stitch. I like the elongated stitch this forms because I think it gives a cleaner look to the edge of the shawl. It is also a good choice if you are going to slip stitch crochet across the edge rather than cutting and reattaching your yarn. You have fewer stitches to work through and the larger stitch makes it easier to crochet through.
Slip Stitch Crochet
When I first read the pattern, I didn’t even know what a crochet slip stitch was. I found a video on YouTube to figure out how to do it, and I’m embedding that video here for you.
The end of each point in the MAPLE LEAF pattern ends with a chain one. I bound off after doing the chain one. I then switched from knitting needle to crochet hook. Slip the crochet hook through that last chain one, and crochet through each edge stitch until you get back to your knitting needle with the live stitches. Bring the last crochet loop up on to your knitting needle. This adds an extra stitch to your work. This extra stitch should not be counted as part of your total stitches on the needles for the purposes of the MAPLE LEAF pattern. You should handle it with your edge stitch, knitting the crochet loop and the edge stitch together as is appropriate for where you are in the pattern. In my case, I slipped the crochet loop and edge stitch together since they were the first stitch of the row. When I got to them on the next row where they were the last two stitches, I knit the two together.
Be careful not to pull your slip stitches too tight! Using this method, your shawl points will not be as pointy as they might be if you were binding off and weaving in as the pattern is written. If you slip stitch too tightly, you will exacerbate that problem. You can also make it difficult to block the shawl properly because your edges get too tight.
Modifications
I am listing out my modifications here by reference to the row numbers in the original pattern. This is a paid pattern and I am not looking to violate the designer’s copyright by providing portions of the pattern for free. My modifications only change the order of knitting, not the stitch counts or any other substance of the pattern. The only changes I am making are in the corner sections. The main central part of the shawl is knit as written.
When the designer wrote this pattern, she wrote it so that every time you have a choice, you knit first the right hand, then the left hand, then the center. This is true on the large scale: first you knit corner one, then you knit corner five, then you knit the central three corners. It is also true on a small scale, inside each individual corner. As you knit to the end of a point, you bind off and reattach your yarn to the main part of the remaining stitches. But you are usually moving from the right side of the remaining stitches to the left side, which means that if you want to crochet slip stitch you have live stitches in between where you bound off and where you need your yarn to be in order to proceed with the pattern. In order to avoid this problem, the solution is to work from right to left, starting with Corner 1, working across to Corner 5, and always working right to left within a corner. This means jumping around the pattern. These modifications are a list of when and where to jump around in order to work from right to left across the shawl.
When following these modifications, every time you bind off, you do not cut the yarn. Instead, you slip stitch crochet across the edge stitches to bring the working yarn to the live stitches. When you are finished knitting the shawl you have few ends to weave in — only your cast on, final bind off, and any ends you may have due to adding on an additional skein of yarn.
Knit the Central portion of the shawl as written.
From this point on, I numbered the corners / central sections so that I would know which order to knit them. Within each large section, I marked the pattern with letters of the alphabet to subdivide the sections as needed. I am including the numbers and letters in parenthesis here so you can mark your own pattern in advance. After each lettered section, you will be crochet slip stitching to get the working yarn back to the live stitches on your knitting needle. You do not cut the yarn until you are totally finished with the shawl.
(1) Begin Corner 1.
(A) Knit Corner 1 as written through the portion of Row 19 that appears on page 8 of the pattern. Do not knit the remaining portion of Row 19 that appears on page 9 of the pattern.
(B) Skip to Row 20 and knit Rows 20-31 as written.
(C) Knit the remaining portion of Row 19 at the top of Page 9.
End Corner 1.
Skip Corner 5.
(2) Begin Central Part
Starting at the bottom of page 10 of the pattern and continuing on to the top of page 11, work as written the set up rows for the 3 central corners.
End Central Part
(3) Begin Corner 2
(A) Knit Corner 2 as written through the first line of Row 15. Work the first two bullet points under Row 15, with the instructions for the last 20 stitches of that section.
(B) Skip the remaining bullet points under Row 15. Go directly to the Row 16 instructions and continue purling across the row. You do not need to reattach the yarn at this point, since you have not detached it!
Knit Rows 17-47 as written.
(C) Return to the third bullet point under Row 15 and finish working the last 20 stitches of Corner 2.
End Corner 2.
(4) Begin Corner 3.
(A) Knit Corner 3 as written through Row 12.
Once you get to Row 13, work the first 18 stitches as written. Crochet slip stitch to the beginning of the RS and work the stitches that are the central part of Corner 3, as written. Do not work the last 18 stitches of Row 13.
(B) Skip down to Row 14. Work Rows 14-24 as written.
Work the first 7 stitches of Row 25 as written. Crochet slip stitch to the beginning of the RS and work the stitches as written in that bullet point. Do not work the last 7 stitches of Row 25.
(C) Skip down to Row 26. Work Rows 26-45 as written.
(D) Return to the last 7 stitches of Row 25 and work as written.
(E) Return to the last 18 stitches of Row 13 and work as written.
End Corner 3.
(5) Begin Corner 4.
(A) Work Rows 1-12 as written. Work the first line of Row 13. Do not work the last 18 stitches of Row 13.
(B) Skip to Row 14. Since you are just turning the work, you already have working yarn so do not need to attach yarn. Purl across Row 14.
Work Rows 15-24 as written.
Work the first line of Row 25. Do not work the last 7 stitches of Row 25.
(C) Skip to Row 26. Since you are just turning the work, you already have working yarn so do not need to attach yarn. Purl across Row 26.
Knit Rows 27-47 as written.
(D) Work the last 7 stitches of Row 25 as written.
(E) Work the last 18 stitches of Row 13 as written.
End Corner 4.
(6) Begin Corner 5.
(A) Knit Rows 1-18 as written.
Work the first 7 stitches of Row 19 as written. Work the next line of Row 19 as written. Do not work the last 7 stitches of Row 19.
(B) Skip to Row 20. Work Rows 20-31 as written.
(C) Work the last 7 stitches of Row 19 as written.
End Corner 5.
You have finished the shawl! Weave in your remaining ends and block it!
And After All That Work…
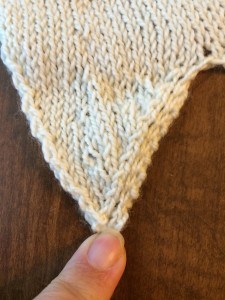
I’m not sure I like the edge you get with the slip stitch crochet.
The edge on the left does not have a slip stitch crochet through it; the edge on the right does. As you can see, even though it isn’t exactly a stitch, you do get additional bulk along the slip stitched edge. Not every edge in the shawl has the slip stitching through it, so your edge has different weights to it that could affect how the shawl hangs. My finger is in this picture, holding down the point because, despite my best efforts to crochet loosely and to block well, the point curls up a bit on the end.
I recently cast on MAPLE LEAF the Third. I’m still in the central portion of the shawl, but I’m contemplating knitting it as written and weaving in all those ends to see if I like the finished product better. I will, of course, let you know what I think after I’m done!


