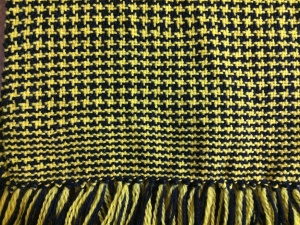
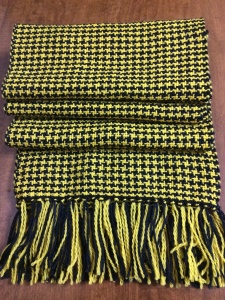
For HPKCHC Quidditch Round 4, we must make something that either (1) gets hung on a wall; (2) is a matched set; or (3) is outlandishly large, sparkly, crazy, or distracting. I’m going with option 2 and weaving a matched set of 5 houndstooth scarves (using the same pattern qualifies as a set). That’s one scarf in each of the four house colors and the fifth in House Unity purples. The Hufflepuff scarf is the first one I’ve finished.
Official Stats
- Draft: Houndstooth
- Loom: 15″ Cricket Table Top Loom
- Reed: 10 dent
- Warp Stats
- Yarn: 150 yards (including loom waste) of Knit Picks Palette in Yellow and 150 yards (including loom waste) of Knit Picks Palette in Black
- Loom waste: 28 yards
- Total Warp Ends: 106
- Ends Per Inch (EPI): 10
- Warp Length: 100″
- Weft Stats
- Yarn: 173 yards Knit Picks Palette in Yellow and 173 yards Knit Picks Palette in Black
- Picks Per Inch (PPI): 10 – 12
- Width in the Reed: 10.6″
- Preblocking Dimensions: 10″ x 84″ (not including the fringe)
- Finished Dimensions: 9.5″ x 85″ (including the length of the fringe)
- Made for: Undecided at the moment
- Ravelry Project Page
About this Project
This is my first color and weave project. Color and weave means that it is in plain weave — the weft goes alternately over and under the warp threads — and the pattern is created by manipulating the color of the warp and weft threads. This houndstooth pattern is created by warping two strands of black alternating with two strands of yellow and following the same pattern in the weft (two picks of black followed by two picks of yellow). I learned a great deal with this project.
Using Warp Sticks
This is the first project on which I used warp sticks rather than paper to separate the layers of the warp on the warp beam. Since I’ve already written an entire blog post about that, I won’t get into it again, except to reiterate that I love warp sticks!
Balanced Weave
In all my previous projects, I did not make an attempt to achieve a balance weave. A balanced weave means that the number of warp threads per inch matches the number of weft threads per inch. All of my previous projects used 8 ends per inch, so a balanced weave would have been to throw 8 picks per inch. I was weaving 12 to 16 picks per inch, depending on the project. When I first started this scarf, I was continuing in my previous practice of beating the weft in more than I should. After a couple of inches, it was obvious that I needed to work on that because I was getting stripes rather than a houndstooth check.

The weave was much more open than felt right to me. I realized that I’ve been attempting to get the look of a finished project while doing the weaving rather than trusting that blocking will close up the fabric. Once I got in the right rhythm, I was able to maintain it for the rest of the scarf.
Selvedge Management
In order to create the houndstooth check, each color yarn was on its own shuttle.
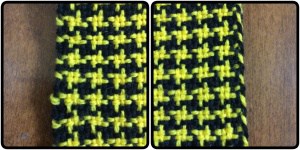
You don’t cut the yarn after each set of two picks of that color. You carry the yarn up the edge of the project. On the first few color changes, I was wrapping the yarn in an odd fashion and almost creating knots. Eventually, I realized that the best way to carry the yarn up the side was to make sure that the color I was about to weave came up over the color I had just finished weaving. As a result of carrying the yarns in this fashion, the left and right selvedges look slightly different.

Hemstitching
In order to finish a woven project, you have to make sure that the beginning and ending edges are secured. The most common way to do this is to tie knots in the fringe. The fringe is made up of warp threads that extend past the end of the weft. Tying the fringe obviously secures the warp thread. The weft is secured at the same time because the knots are pushed up against the weft. However, it can be a bit tricky to keep that first pick of weft in place while you are tying the knots. It tends to slide down and I have not been able to get as clean an edge as I would like because of that.
Hemstitching is a way to secure the edges of the weft so that they do not slide out while you are tying the knots. I learned to hemstitch by watching the directions in two Craftsy rigid heddle weaving classes. I tried to take pictures of the finished edge to show you in this blog post, but since I started and ended this scarf with black and did the hemstitching in black, you can not see any detail in the pictures.
Hemstitching was fairly quick and I like the nice clean edge it gave me. In the future, I will hemstitch every project that is going to have fringe on the edge. I’ll try to remember to take some pictures on my next project so I can share them with you.
In Conclusion
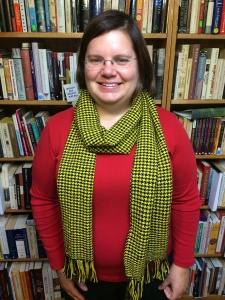
Yellow is not a color I usually wear. I gravitate towards greens and purples and blues, with some red once in a while. But I found myself in love with this scarf. I wore it around the house most of the afternoon, even though I wasn’t cold. I am quite proud of the finished product, despite its flaws. I also love the drape and feel of the finished fabric. This is my first project with fingering weight yarn and I am surprised by how light the scarf feels while still being warm. Everything about this scarf makes me happy!


I LOVE this new scarf!